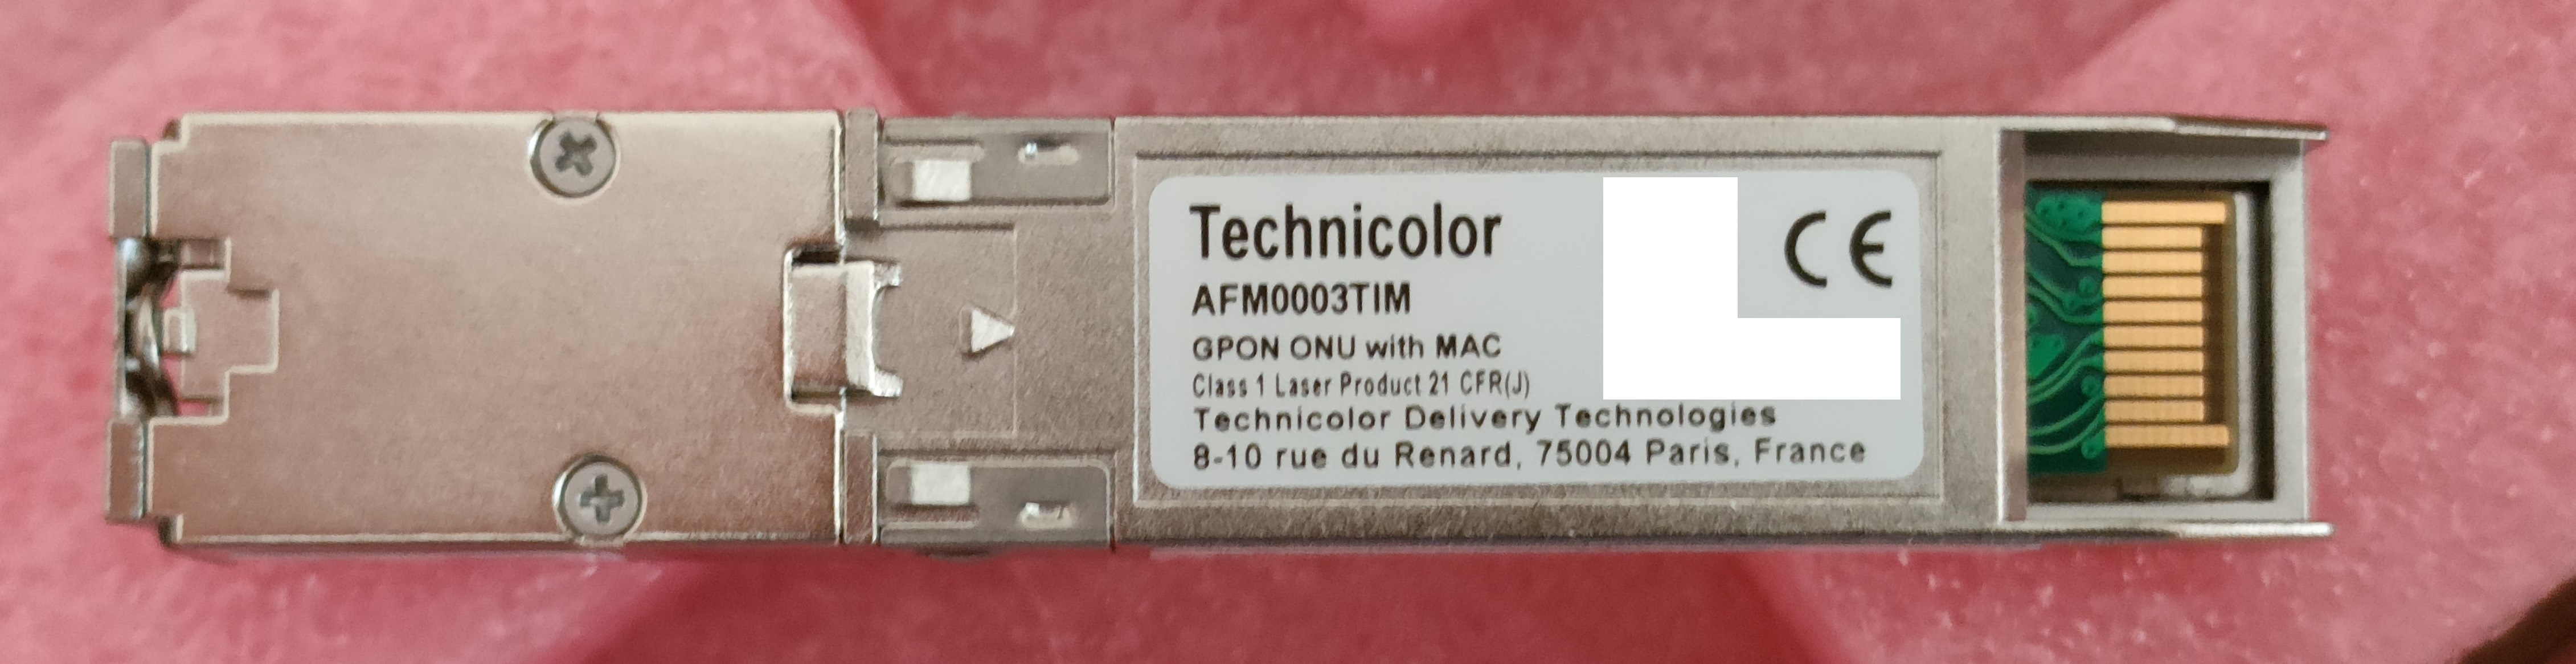
Technicolor AFM0003
Also sold as: HiSense LTE3415-SH+
Hardware Specifications
| Vendor/Brand | Technicolor |
| Model | AFM0003TIM |
| ODM | HiSense |
| ODM Product Code | LTE3415-SH+ |
| Chipset | Realtek RTL9601CI |
| Flash | 128MB |
| RAM | 32MB |
| System | Linux 2.6 (Luna SDK 1.9) |
| HSGMII | Yes, but not working with stock firmware |
| Optics | SC/APC |
| IP address | 192.168.2.1 |
| Web Gui | Can be enabled, user admin, password system |
| SSH | No |
| Telnet | ✅ |
| Form Factor | miniONT SFP |
| Serial | ✅ |
| Serial baud | 115200 |
| Serial encoding | 8-N-1 |
| Multicast | ✅ |
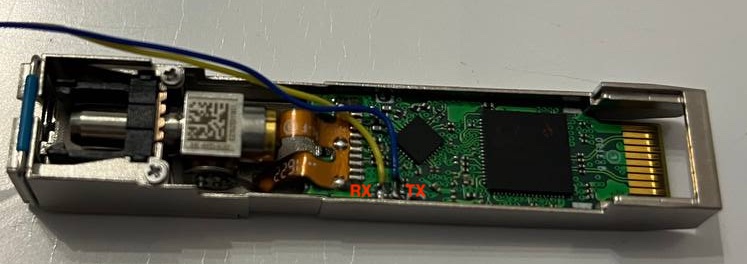
Serial
The stick has a TTL 3.3v UART console (configured as 115200 8-N-1) that can be accessed from the top surface. To accept TX line commands, the GND of the TTL adapter should be attached to the stick’s shield:
Hardware Revisions
- AFM0003TIM (IP address: 192.168.2.1)
List of software versions
- V1_7_8_220201
List of partitions
| dev | size | erasesize | name |
|---|---|---|---|
| mtd0 | 000c0000 | 00020000 | “boot” |
| mtd1 | 00020000 | 00020000 | “env” |
| mtd2 | 00020000 | 00020000 | “env2” |
| mtd3 | 01800000 | 00020000 | “config” |
| mtd4 | 00800000 | 00020000 | “k0” |
| mtd5 | 02a40000 | 00020000 | “r0” |
| mtd6 | 00800000 | 00020000 | “k1” |
| mtd7 | 02a40000 | 00020000 | “r1” |
| mtd8 | 00001000 | 00020000 | “Partition_008” |
| mtd9 | 00001000 | 00020000 | “Partition_009” |
| mtd10 | 00001000 | 00020000 | “Partition_010” |
| mtd11 | 00001000 | 00020000 | “Partition_011” |
| mtd12 | 00800000 | 00020000 | “linux” |
| mtd13 | 02a40000 | 00020000 | “rootfs” |
This stick supports dual boot.
k0 and r0 respectively contain kernel and firmware of the first image, while k1 and r1 contain kernel and firmware of the second one.
Useful files and binaries
Useful files
-
/var/config/lastgood.xml- Contains the user portion of the configuration -
/var/config/lastgood-hs.xml- Contains the “hardware” configuration (which should not be changed) -
/tmp/omcilog- OMCI messages logs (must be enabeled, see below)
Useful binaries
/etc/scripts/flash- Used to manipulate the config files in a somewhat safe mannerxmlconfig- Used for low-level manipulation of the XML config files. Called by/etc/scripts/flashnv- Used to manipulate nvram storage, including persistent config entries vianv setenv/nv getenvomcicli- Used to interact with the running OMCI daemonomci_app- The OMCI daemondiag- Used to run low-level diagnostics commands on the stick
GPON ONU status
Getting the operational status of the ONU
diag gpon get onu-state
Querying a particular OMCI ME
# omcicli mib get MIB_IDX
Getting/Setting Speed LAN Mode
LAN_SDS_MODE parameter. Using modded firmware is needed. Before editing the sync speed make sure your hardware supports it. To change the link mode use this command:
# /etc/scripts/flash get LAN_SDS_MODE
LAN_SDS_MODE=0
# /etc/scripts/flash set LAN_SDS_MODE 1
| Value | cat /proc/kmsg | Mode | Behavior |
|---|---|---|---|
| 1 | <4>change mode to 1(Fiber 1G) | FIBER | 1GbaseX with auto-neg on |
| 2 | <4>change mode to 2(SGMII PHY) | TP MII | 1Gb PHY |
| 3 | <4>change mode to 3(SGMII MAC) | MII | 1Gb MAC |
| 4 | <4>change mode to 4(HiSGMII PHY) | TP MII | 2.5Gb PHY |
| 5 | <4>change mode to 5(HiSGMII MAC) | MII | 2.5Gb MAC |
| 6 | <4>change mode to 6(2500BaseX) | FIBER | 2500baseX with auto-neg on |
GPON/OMCI settings
Getting/Setting ONU GPON Serial Number
# /etc/scripts/flash get GPON_SN
GPON_SN=TMBB00000000
# /etc/scripts/flash set GPON_SN TMBB0A1B2C3D
Getting/Setting ONU GPON PLOAM password
# /etc/scripts/flash get GPON_PLOAM_PASSWD
GPON_PLOAM_PASSWD=AAAAAAAAAA
# /etc/scripts/flash set GPON_PLOAM_PASSWD AAAAAAAAAA
Getting/Setting OMCI software version (ME 7)
# /etc/scripts/flash get OMCI_SW_VER1
OMCI_SW_VER1=YOURFIRSTSWVER
# /etc/scripts/flash set OMCI_SW_VER1 YOURFIRSTSWVER
# /etc/scripts/flash get OMCI_SW_VER2
OMCI_SW_VER1=YOURSECONDSWVER
# /etc/scripts/flash set OMCI_SW_VER2 YOURSECONDSWVER
Getting/Setting OMCI hardware version (ME 256)
# /etc/scripts/flash get HW_HWVER
HW_HWVER=V2.0
# /etc/scripts/flash set HW_HWVER MYHWVERSION
Getting/Setting OMCI vendor ID (ME 256)
# /etc/scripts/flash get PON_VENDOR_ID
PON_VENDOR_ID=ZTEG
# /etc/scripts/flash set PON_VENDOR_ID HWTC
Getting/Setting OMCI equipment ID (ME 257)
# /etc/scripts/flash get GPON_ONU_MODEL
GPON_ONU_MODEL=DFP-34X-2C2
# /etc/scripts/flash set GPON_ONU_MODEL DFP-34X-XXX
Getting/Setting OMCI OLT Mode and Fake OMCI
Configure how ONT Stick handle OMCI from OLT:
# /etc/scripts/flash get OMCI_OLT_MODE
OMCI_OLT_MODE=1
# /etc/scripts/flash set OMCI_OLT_MODE 2
| Value | Note | OMCI Information |
|---|---|---|
| 0 | Default Mode | Stock setting, some values cannot be changed |
| 1 | Huawei OLT Mode | Huawei MA5671a |
| 2 | ZTE OLT Mode | ZTE |
| 3 | Customized Mode | Custom Software/Hardware Version, OMCC, etc… |
Some vendors/wholesale providers/ISPs have explicit LAN Port Number provisioning or proprietary OMCI that the stick cannot understand, this will make the stick reply OK to whatever the OLT sends it via OMCI.
0 = Disable, 1 = Enable, Default is 0
# /etc/scripts/flash get OMCI_FAKE_OK
OMCI_FAKE_OK=0
# /etc/scripts/flash set OMCI_FAKE_OK 1
Advanced settings
Setting management IP
# /etc/scripts/flash get LAN_IP_ADDR
LAN_IP_ADDR=192.168.2.1
# /etc/scripts/flash set LAN_IP_ADDR 192.168.1.1
Getting/Setting the L2 Bridge MTU
Getting/Setting the MTU of the L2 bridge
# diag switch get max-pkt-len port all
Port Speed
----------
0 1538
2 2031
# diag switch set max-pkt-len port all length 2000
Checking the currently active image
# nv getenv sw_active
sw_active=1
# nv getenv sw_version0
sw_version0=V1_7_8_210412
# nv getenv sw_version1
sw_version1=V1_7_8_210412
Booting to a different image
# nv setenv sw_commit 0|1
# reboot
Enabling the Web UI
# /bin/iptables -D INPUT -p tcp --dport 80 -j DROP
Transfering files from/to the stick
Works with binary files too, just run md5sum on source and destination to make sure you are not corrupting anything… From the stick to the PC:
# tftp <IP>
tftp> put <filename> <directory>
tftp> q
From the PC to the stick:
# tftp <IP>
tftp> get <filename>
tftp> q
Extracting and repacking the rootfs
# unsquashfs mtd5.bin
# mksquashfs squashfs-root rootfs -b 131072 -comp lzma -no-recovery
Flashing a new rootfs
Flash mtd4/5 if you are on image1, mtd6/7 if you are on image0.
The following commands are used to flash a new rootfs to image1 and then boot to it
# flash_eraseall /dev/mtd7
# cat /tmp/rootfs.new > /dev/mtd7
# nv setenv sw_version1 NEW_SOFTWARE_VERSION
# nv setenv sw_commit 1
# reboot